Getting ready to test a new service or API for your project is a common requirement. Normally we’d just create something in PostMan or run a curl command straight from the terminal. But what if you could do something that becomes part of your project in source control instead, wouldn’t that be pretty neat? This is where the REST Client for Visual Studio Code comes in useful.
The REST Client plugin by Huachou Mao is a seemingly simple, yet powerful tool to have at your disposal when working in a service-oriented environment. It allows you to quickly make calls to an API endpoint, and to easily repeat those calls, all within Visual Studio Code.
In this article, I’ll describe how I came across the REST Client plugin, how I use it in projects, and how I use it to try out new APIs.
I first came across the REST Client plugin a few years ago at a .NET Oxford Meetup event. As I recall, the presenter was using it to quickly test their API endpoints, seeing the response in a new tab within Visual Studio Code. It was such a perfectly simple implementation that I went and installed it that night. It was impressive, but until recently, I’d been using Postman as my go-to tool for checking out REST API calls. It had served me well and I’d invested a lot of time in setting up collections, but recently, I wanted to make some changes to my setup.
This is when I remembered the REST Client. The idea of being able to execute web requests quickly from my VS Code instance was an immediate pull. So I decided to investigate further to see if it would tick all the boxes.
The question is, what were the boxes that I was trying to tick? I really wanted to achieve a couple of simple things:
- Add my calls to source control. I don’t want to lose them, and I’ll more than likely run them more than once.
- Secure my API key. We don’t want those in source control!
Source Control
So this one is simple. Once you've installed the plugin, you need to create and open a file in Visual Studio Code with a file extension of ‘.http’. Of course, once you get your API calls into source control, you need to take a look at one very important thing - API keys.
Securing API Keys
Most of the APIs that I work with require authorization and that’s probably true in the majority of cases. Storing your key in a source repository (especially a public one) is not good practice. That gave me the conundrum of how I might make calls and not check those API keys into source control.
If you consider the following API call:
curl --request POST \
  --url https://manage.kontent.ai/v2/projects/7af531c3-f4b9-4af6-8f9e-383f51ad3e4b/types \
  --header 'Authorization: Bearer ew0KICAiYWxnIjogIkhTMjU214ZIiwNCiAgInR5cCI6ICJKV1QiDQp9.ew08KICAianRpIjogImJhYzhkODIxMzI1NTRlNGZiNGQxMGQ5MzAFYNhNDZlZmQyIiwNC629iAgImlhdCI6ICIxNjE5NzcwODE5IiwNCiAgImV4cCI6ICIxOTY1MzcwODE5IiwNCiAgInByb2plY3RfaWQiOiAiY2MzODBiODg1OTcwMDFiMzQzZjUwMmE3Y2FkNmU4NjIiLA0KICAidmVyIjogIjIuMS4wIiwNCiAgInVpZCBCI6ICJ1c3JfMHZPTjBVTDFBQ2ZVOXNyYjVUczQyWSIsDQogICJhdWQiOiAibWFuYWdlLmtlbnRpY29jbG91ZC5jb20iDQp9.4-gWmqdw7eybaZu3YkwgpoDieZr8zS2cKMOqBMX-t_E' \
  --header 'Content-type: application/json'

  --data '
{
  "external_id": "article",
  "name": "Article",
  "codename": "article",
  "elements": [
    {
      "name": "Article title",
      "codename": "title",
      "type": "text"
    },
    {
      "name": "Article body",
      "codename": "body",
      "type": "rich_text"
    },
    {
      "name": "Author bio",
      "codename": "bio",
      "allowed_blocks": [
        "images",
        "text"
      ],
      "type": "rich_text"
    }
  ]
}’
Great, it does what I need, but I really don’t want that authorization token stored in my source control, so what can we do about that?
(don’t worry, the example keys above are invalid 🤓)
Variables and Environments
This is where variables and environments come in with the REST Client extension. You can add new environments in your settings.json file to cater for this. As an example, I have the following in the project that I'm currently working on:
    "rest-client.environmentVariables": {
        "$shared": {

        },
        "dev": {
            "project_id": "b82a...yeah-not-the-real-key...3a62",
            "preview_api": "ew0K...yeah-not-the-real-key...UeMk",
            "management_api": "ew0K...yeah-not-the-real-key...H4p0",
        },
        "prod": {
          "project_id": "db3f...yeah-not-the-real-key...a2f4",
          "preview_api": "ew0K...yeah-not-the-real-key...68ZI",
          "management_api": "ewto...yeah-not-the-real-key...oC3E",
      },
    },
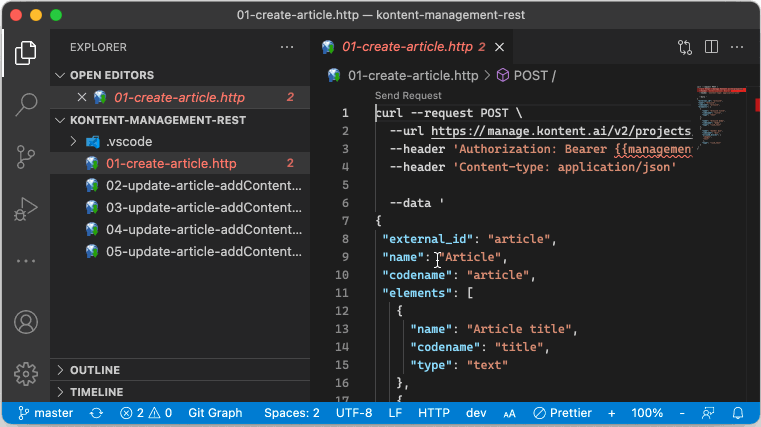
These variables can now be used inline, so our initial API call now looks like this:
curl --request POST \
  --url https://manage.kontent.ai/v2/projects/{{project_id}}/types \
  --header 'Authorization: Bearer {{management_api}}' \
  --header 'Content-type: application/json'

  --data '
{
  "external_id": "article",
  "name": "Article",
  "codename": "article",
  "elements": [
    {
      "name": "Article title",
      "codename": "title",
      "type": "text"
    },
    {
      "name": "Article body",
      "codename": "body",
      "type": "rich_text"
    },
    {
      "name": "Author bio",
      "codename": "bio",
      "allowed_blocks": [
        "images",
        "text"
      ],
      "type": "rich_text"
    }
  ]
}’
That's not only simpler to read, but those API keys are not stored in our file or the project as a whole, keeping them out of source control.
When using the extension, these environments can be selected in VS code, making it easy to move between them.

Wrapping it all up
The REST Client extension is a really useful tool to have at your disposal. In this article, I've really only scratched the surface of what it can do. It's well worth taking a few moments to look through the documentation in GitHub to find out what it's capable of.
I can honestly say that this extension has saved me a lot of time and it's in my list of default extensions that I would recommend to anyone using VS Code.