I've often found the need to re-use a form throughout a Kentico implementation in more than one place. The problem this gives me is that I don't necessarily know where that form was completed. Using a custom form control blended with alternative forms makes this easy.
The problem
So imagine you're building a company website and you want to add a careers section. For each vacancy, you want to have a 'quick application' form. This should just capture some really basic information like candidate name, email address, and position they're interested in.
Typically, I've seen this done in four ways:
- The application form has a drop-down list where the candidate can select the position that they're interested in.
- Each vacancy has its own alternative form created that has a hard-coded default field for the job title which doesn't show on the edit form.
- Each vacancy has its own form.
- Ignore the different vacancies and just try to figure it out from their application (OMG - so totally bad)
All of these aren't really ideal and either create a large amount of maintenance for the poor soul who is involved in recruitment, or require the user to make sure that the correct vacancy is selected (let's ignore the 4th option because it is truly horrible).
A different solution
Working on a previous project, I decided to take a different approach to this. Typically, if I was building a bespoke web application, I would simply create a hidden field to deal with the vacancy being viewed. This isn't really an option that I know of (at least, not out-of-the-box) with Kentico, but it is achievable with a custom form control and alternative forms.
Hidden input form control
The hidden input form control is really easy to put together. All it does is contain a simple asp:HiddenInput web user control which is tied to the field value. In this example, I've not bothered with any validation this thing simply has a value.
To prove how simple it is, here is the code for the hidden input:
Setting up the form
The trick to making this useful is in the setup of the form and knowing how to use alternative forms and their code names.
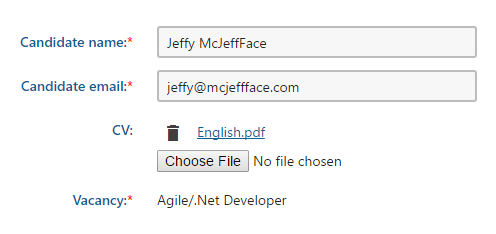
The main form is going to be the application form that our candidates see when they're browsing the website. I've called it Vacancy application and set it up with the following fields:
- Candidate name
- Field name: VacancyApplicationCandidateName
- Data type: Text
- Required: Yes
- Field caption: Name
- Form control: Text box
- Candidate email
- Field name: VacancyApplicationCandidateEmail
- Data type: Text
- Required: Yes
- Field caption: Email
- Form control: Email
- Candidate VC
- Field name: VacancyApplicationCV
- Data type: Text
- Required: No
- Field caption: CV
- Form control: Upload file
- Vacancy
- Field name: VacancyApplicationCandidateEmail
- Data type: Text
- Required: Yes
- Default value: {%DocumentName%}
- Field caption: Vacancy
- Form control: Hidden input
Typically, I'd also create a custom layout, but for the purpose of this article, I'm just going to use the default layout.
If I drop this from on to a page, it will now collect the name of the page that was being viewed when the form was completed. You can see this when you look at the recorded data tab in the CMS admin.
Where this doesn't work is looking at the individual records; the hidden input field is uncannily hidden when you open the edit form, which means you can't see what job they applied for!


Creating the 'update' view
To fix that issue, you need to create an alternative formfor the 'update' view. To do this, we follow some simple steps:
- In the Forms application, select our Vacancy application form and slick Alternative forms in the left navigation.
- You should see a green button with the text Create new form. Click this and give your new for the name "update" (this will create a code name of "Update". The codename here is important, when Kentico sees an alternative form with this code name, it will use it for editing existing items.
- When Kentico creates the alternative form, it copies across all of the fields from the original form and their settings. All we have to do now is to change the Vacancy fields:
- Field name: VacancyApplicationCandidateEmail
- Data type: Text
- Required: Yes
- Default value: {%DocumentName%}
- Field caption: Vacancy
- Form control: Label (I've used a Label rather than Text box because I don't want this to be edited.)
Conclusion
There are a great many ways that you can extend Kentico, and not all of them require coding. Knowing how to use Kentico's forms more effectively can help you to deliver solutions in a shorter time-frame that not only work well for your customers, but also for the editors. Alternative forms and custom form layouts are essential to any Kentico developer's toolkit when working with the portal engine, and I would recommend experimenting with the options that are available.